Enabling External Traffic with Ingress API
Before deploying our workloads, the CCE cluster must be equipped with a set of foundational components. In this section, we'll install and configure essential prerequisites such as an Ingress Controller for routing external traffic, cert-manager for managing TLS certificates, and other supporting workloads. These components establish the baseline infrastructure required to expose services securely and ensure smooth operation of the application stack within the Kubernetes environment.
As of March 2026, the Ingress NGINX is retired; see here the announcement of the Kubernetes SIG Network and the Security Response Committee. The Ingress API support is deprecated in favor of the more flexible and powerful Gateway API and any new future features development is frozen.
For that reason, it is recommended to transition to use the Gateway API for new deployments or when updating existing ones. For more details consult the Best Practice: Enabling External Traffic with Gateway API.
Overview
Kubernetes uses ingress resources to define how incoming traffic should be handled, while the Ingress Controller is responsible for processing the actual traffic,
- Ingress object: is a set of access rules that forward requests to specified Services based on domain names or paths. It can be added, deleted, modified, and queried by calling APIs.
- Ingress Controller: is an executor for forwarding requests. It monitors the changes of resource objects such as ingresses, Services, endpoints, secrets (mainly TLS certificates and keys), nodes, and ConfigMaps in real time, parses rules defined by ingresses, and forwards requests to the target backend Services.
The way of implementing Ingress Controllers varies depending on their vendors. CCE, out-of-the-box, supports LoadBalancer Ingress Controllers and NGINX Ingress Controllers.
- LoadBalancer Ingress Controllers are deployed on master nodes and forward traffic based on the ELB. All policy configurations and forwarding behaviors are managed on the ELB.
- NGINX Ingress Controller are deployed in clusters using the NGINX Ingress Controller Add-on. It provides external access through NodePort and forward external traffic to other services in the cluster through Nginx. All traffic forwarding behaviors and forwarding objects are within the cluster.
For a deeper understanding of their differences, refer to the comprehensive feature comparison list in Open Telekom Cloud Help Center.
Because the Ingress API is standardized, you are free to choose any Ingress Controller implementation that fits your needs; cloud-native, open-source, or vendor-specific, without changing how you define Ingress rules.
Refer to an extensive list of Ingress Controller implementations in the Kubernetes official documentation.
In the view of the above and the retirement of the Ingress NGINX, we recommended you consider alternative Ingress Controller implementations if you are not ready to move to Gateway API, such as Contour or HAProxy, which are both compatible with CCE and provide advanced features and performance optimizations.
Configuring your registar
We have to transfer the management of the NS-Records of your domain to the Domain Name Service of Open Telekom Cloud. Go on the site of your registar and make sure you configure the following:
Turn off any Dynamic DNS service for the domain or the subdomains you are going to bind with Open Telekom Cloud DNS. Change the NS-Records of your domain or the subdomains to point to:ns1.open-telekom-cloud.com and ns2.open-telekom-cloud.com
Once the nameserver changes have propagated and Open Telekom Cloud DNS service assumes authoritative control of your domain, you can proceed to define DNS zones and records. From here (assuming you have already created a Public DNS Zone in the Open Telekom Cloud DNS service for you domain), you have two options depending on your operational approach:
-
Manual Configuration
Create an A record that links the desired FQDN for each workload (e.g.,application.example.com) to the EIP of the external load balancer you provision manually.importantThis step must be performed for each individual workload or consider creating a wildcard record
*.example.compoint to the ELB's EIP if you plan to use multiple subdomains for different workloads. The former approach is suitable for smaller environments or when you prefer direct control over DNS records without automation. -
Automated Configuration with ExternalDNS
Deploy the ExternalDNS in your Kubernetes cluster. It watches Ingress resources (among others such as CRDs and Services) and automatically creates or updates DNS records in your Open Telekom Cloud DNS zone according to annotations in these resources. This approach is well-suited for dynamic environments or production setups that leverage infrastructure-as-code and minimize manual management. Follow the instructions of Automate DNS Records Creation from CCE Ingresses with ExternalDNS.
Installing an Ingress Controller
Creating an Elastic Load Balancer
- Manual Creation of Elastic Load Balancer
- Automatic Creation of Elastic Load Balancer
This step has to take place once for every cluster as long as you are planning to use a single load balancer for all of your workloads.
The first step in preparing the environment is to provision an Elastic Load Balancer (ELB), which will serve as the external entry point for traffic into the CCE cluster. Setting up an ELB setup is critical for handling external traffic and forwarding requests to services within the cluster, such as the Ingress Controller.
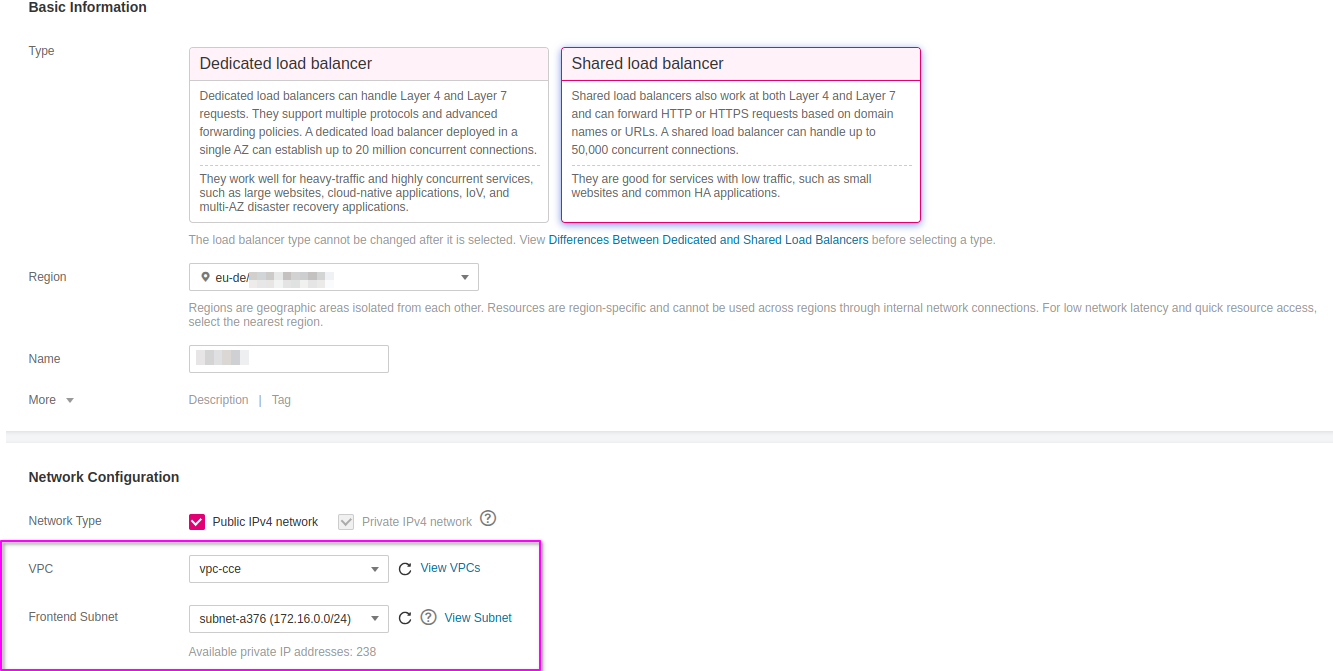
Go to Open Telekom Cloud Console -> Network -> Elastic Load Balancing and click Create Elastic Load Balancer. Ensure that the Elastic Load Balancer is provisioned within the same VPC and Subnet as your CCE cluster. This network alignment is essential to allow the load balancer to reach the CCE worker nodes directly using their private IP addresses. Misplacing the ELB in a different network segment would result in unreachable backends and broken ingress routing.
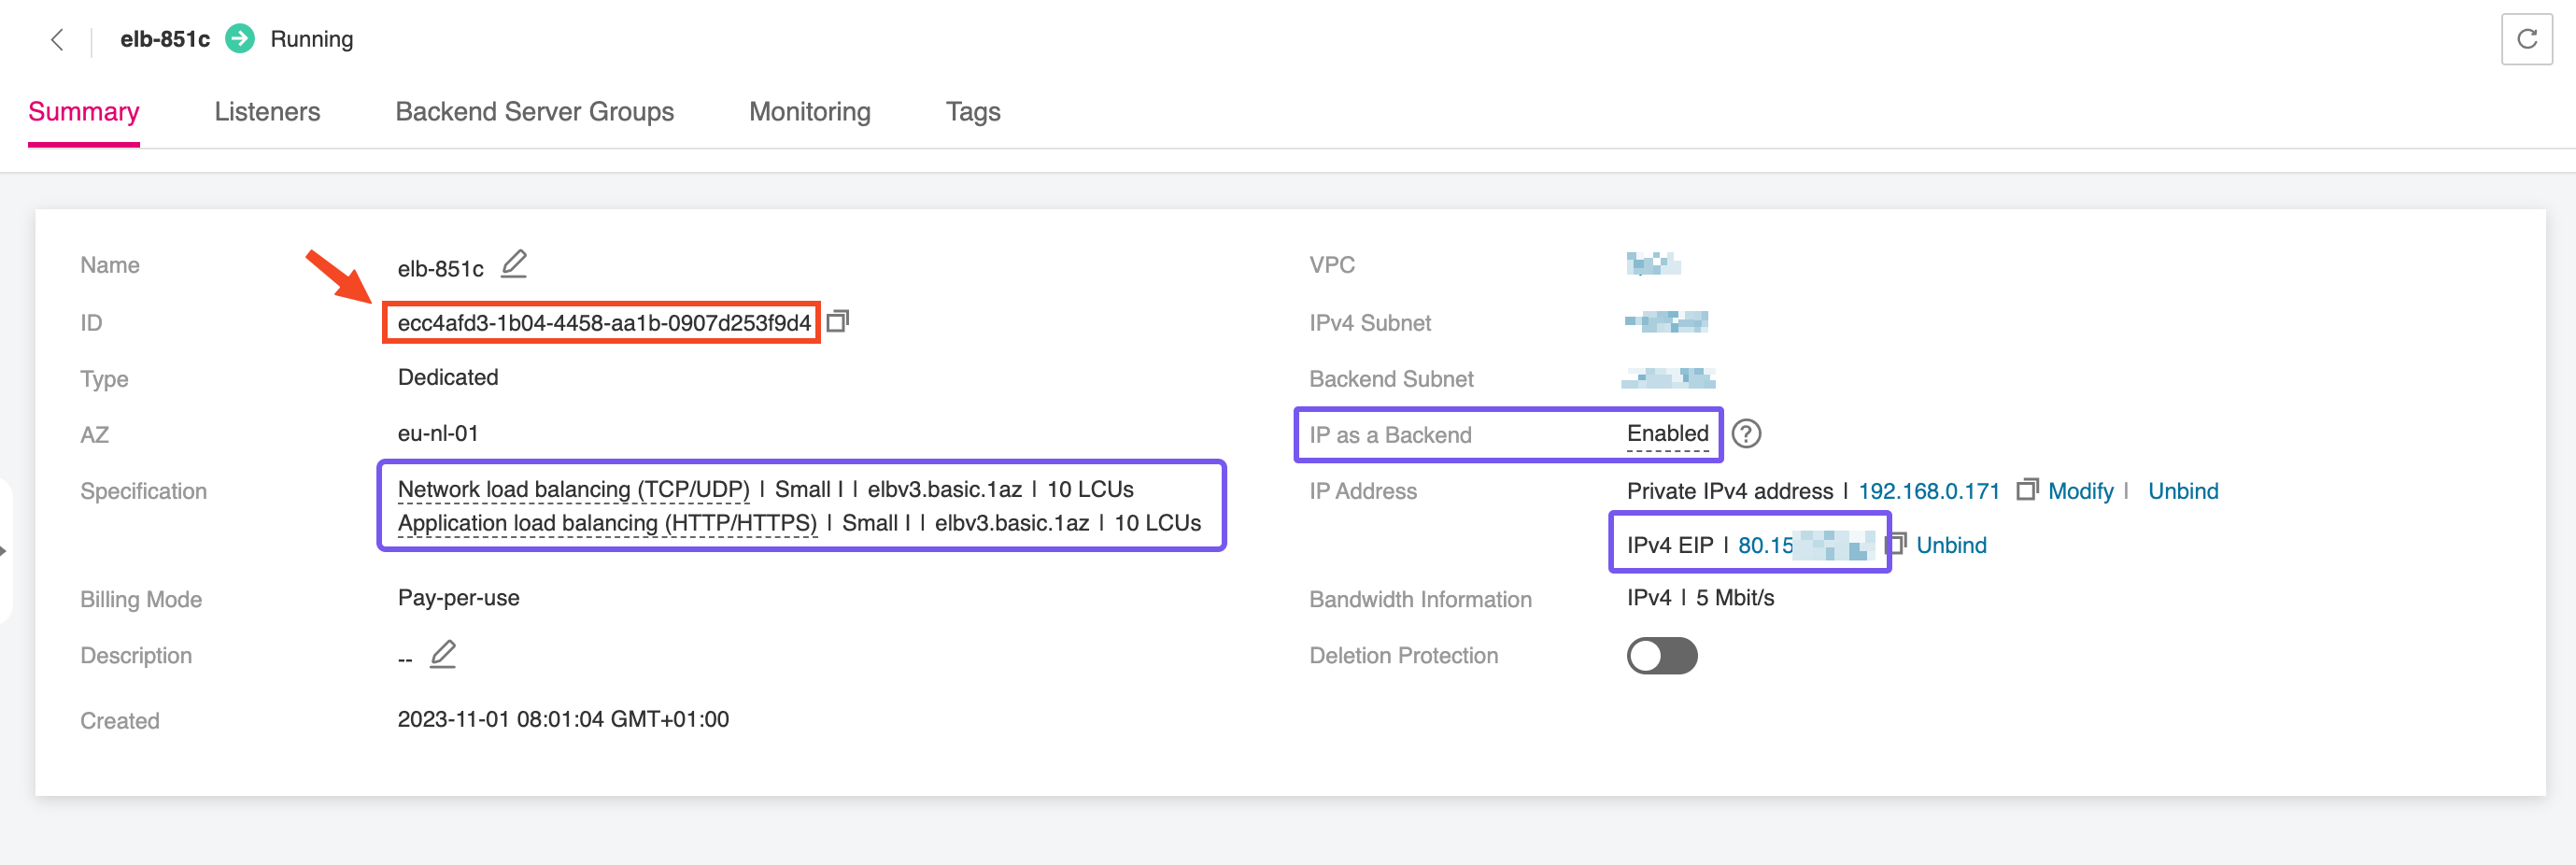
After the Elastic Load Balancer is provisioned, make sure to record the ELB ID. This unique identifier is needed when configuring the NGINX Ingress Controller, enabling it to correctly bind to the external load balancer and manage incoming traffic. The ELB ID acts as a reference to link Kubernetes resources with the underlying network infrastructure, ensuring smooth integration between your Ingress layer and the public-facing endpoint.
You don't need to take any action in this case as the Elastic Load Balancer is automatically created and configured through specialized annotations defined on the Ingress Controller.
Deploying an Ingress Controller
This step only needs to be performed once per cluster, if you plan to use a single load balancer for all workloads.
In this step, we'll deploy the Ingress Controller of your choice, which serves as the bridge between the Elastic Load Balancer and the services running within the CCE cluster. The controller manages HTTP(S) routing and termination, directing external traffic to the correct internal services based on host and path rules.
- NGINX Ingress Controller CCE Add-on
- Contour
- HAProxy
Deploying the NGINX Ingress Controller in CCE is streamlined through the use of a dedicated add-on available in the Open Telekom Cloud Console. This add-on simplifies the installation and configuration process, allowing you to quickly set up an NGINX Ingress Controller that integrates seamlessly with your CCE cluster. In this case we must provide the Elastic Load Balancer manually.
Navigate to Open Telekom Cloud Console -> Cloud Container Engine -> Clusters; choose your cluster from the list and then on the left-hand sidebar click Clusters -> Add-ons, and select the NGINX Ingress Controller add-on and click Install. During the installation process, you will be prompted to specify the ELB details to ensure proper integration.
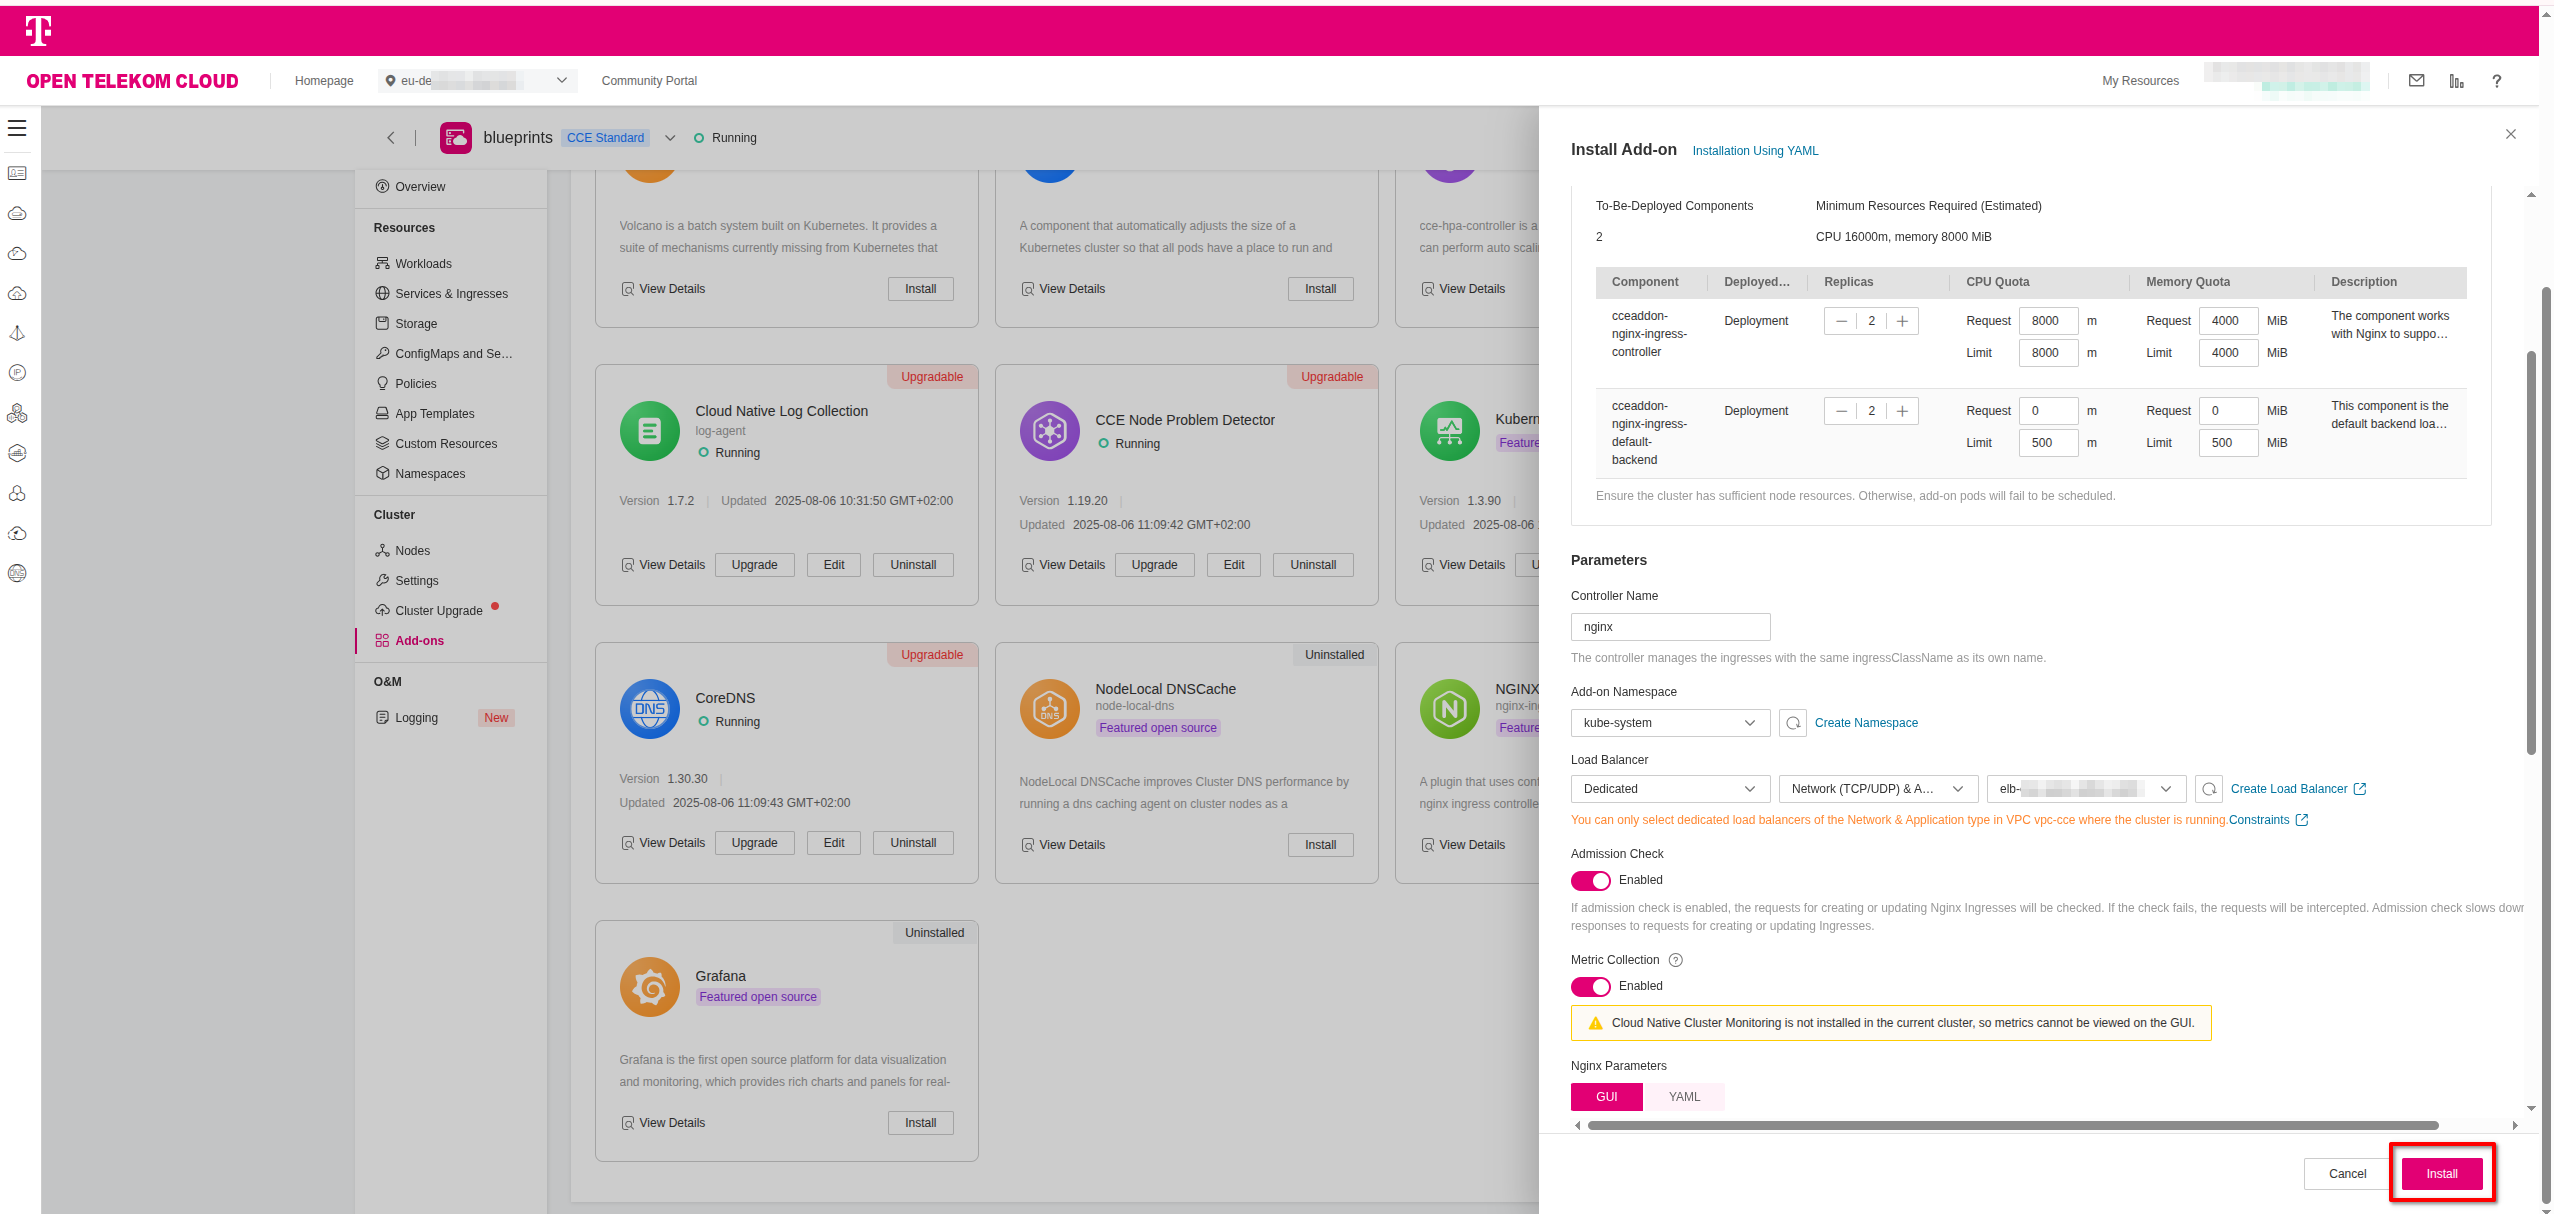
Setup the parameters to your needs, but make sure to set the Parameters.Controller Name parameter to a value that you will reference later in the Ingress manifest and doesn't collide with
any other existing Ingress Controller in the cluster (e.g., nginx is the default one). Click Install to deploy the controller.
To deploy the Contour Ingress Controller on Kubernetes, we use Helm with a custom values file, commonly named overrides.yaml, to define the configuration parameters for the deployment:
envoy:
  service:
    type: LoadBalancer
    annotations:
      kubernetes.io/elb.class: performance
      kubernetes.io/elb.http-redirect: "true"
      kubernetes.io/elb.listen-ports: '[{"HTTP": 80},{"HTTPS": 443}]'
      kubernetes.io/elb.autocreate: >-
        {
          "type": "public",
          "bandwidth_name": "cce-bandwidth-contour-ingress",
          "bandwidth_chargemode": "traffic",
          "bandwidth_size": 5,
          "bandwidth_sharetype": "PER",
          "eip_type": "5_bgp",
          "l7_flavor_name": "L7_flavor.elb.s1.small",
          "l4_flavor_name": "L4_flavor.elb.s1.small",
          "available_zone": ["eu-de-01"]
        }

contour:
  replicas: 2
1️⃣ If you are in the eu-nl region, make sure to update the available_zone to eu-nl-01 and/or eu-nl-02
2️⃣ If you provisioned the ELB manually in the previous step, you can skip all kubernetes.io/elb.* annotations related to automatic provisioning and configuration of the ELB,
and add a single annotation that points to the unique ID, <ELB_ID>, of the manually created ELB:
envoy:
  service:
    type: LoadBalancer
    annotations:
      kubernetes.io/elb.id: <ELB_ID>
contour:
  replicas: 2
Once the overrides.yaml file is ready, you can install the controller using Helm. This will deploy all necessary components into a dedicated namespace called contour. Execute the following commands:
helm repo add contour https://projectcontour.github.io/helm-charts/
helm repo update

helm upgrade --install contour contour/contour \
  -f overrides.yaml \
  --namespace contour --create-namespace
This will set up the Contour Ingress Controller for Kubernetes with your custom configuration, including the ELB binding.
Once deployed, Kubernetes Ingress resources referencing the contour class will route traffic through this controller.
To deploy the HAProxy Kubernetes Ingress Controller, we use Helm with a custom values file, commonly named overrides.yaml, to define the configuration parameters for the deployment:
controller:
  service:
    type: LoadBalancer
    annotations:
      kubernetes.io/elb.class: performance
      kubernetes.io/elb.http-redirect: "true"
      kubernetes.io/elb.listen-ports: '[{"HTTP": 80},{"HTTPS": 443}]'
      kubernetes.io/elb.autocreate: >-
        {
          "type": "public",
          "bandwidth_name": "cce-bandwidth-haproxy-ingress",
          "bandwidth_chargemode": "traffic",
          "bandwidth_size": 5,
          "bandwidth_sharetype": "PER",
          "eip_type": "5_bgp",
          "l7_flavor_name": "L7_flavor.elb.s1.small",
          "l4_flavor_name": "L4_flavor.elb.s1.small",
          "available_zone": ["eu-de-01"]
        }
1️⃣ If you are in the eu-nl region, make sure to update the available_zone to eu-nl-01 and/or eu-nl-02
2️⃣ If you provisioned the ELB manually in the previous step, you can skip all kubernetes.io/elb.* annotations related to automatic provisioning and configuration of the ELB,
and add a single annotation that points to the unique ID, <ELB_ID>, of the manually created ELB:
controller:
  service:
    type: LoadBalancer
    annotations:
      kubernetes.io/elb.id: <ELB_ID>
Once the overrides.yaml file is ready, you can install the controller using Helm. This will deploy all necessary components into a dedicated namespace called haproxy-ingress. Execute the following commands:
helm repo add haproxytech https://haproxytech.github.io/helm-charts
helm repo update

helm install haproxy-ingress haproxytech/kubernetes-ingress \
  -n haproxy-ingress --create-namespace \
  -f values.yaml
This will set up the HAProxy Ingress Controller for Kubernetes with your custom configuration, including the ELB binding.
Once deployed, Kubernetes Ingress resources referencing the haproxy class will route traffic through this controller.
Installing the T Cloud Public DNS01 Solver
This step only needs to be performed once per cluster.
Cert-manager DNS providers are integrations with various DNS (Domain Name System) service providers that allow cert-manager, a Kubernetes add-on, to automate the management of SSL/TLS certificates. DNS providers enable cert-manager to automatically perform challenges to prove domain ownership and obtain certificates from certificate authorities like Let's Encrypt.
By configuring cert-manager with the compatible Open Telekom Cloud DNS provider, we can set up automatic certificate issuance and renewal for our Open Telekom Cloud CCE workloads without manual intervention. This automation is crucial for securing web applications and services deployed on CCE clusters.
To enable automated TLS provisioning for workloads in your CCE cluster, follow the recommended approach for as in the Best Practice: Issue an ACME Certificate with DNS01 Solver in CCE.