Enabling External Traffic with Gateway API
Before deploying our workloads, the CCE cluster must be equipped with a set of foundational components. In this section, we'll install and configure essential prerequisites such as a Gateway Controller for routing external traffic, cert-manager for managing TLS certificates, and other supporting workloads. These components establish the baseline infrastructure required to expose services securely and ensure smooth operation of the application stack within the Kubernetes environment.
As of March 2026, the Ingress NGINX is retired; see here the announcement of the Kubernetes SIG Network and the Security Response Committee. The Ingress API support is deprecated in favor of the more flexible and powerful Gateway API and any new future features development is frozen.
For that reason, it is recommended to transition to use the Gateway API for new deployments or when updating existing ones.
Overview
Kubernetes uses Gateway API resources to define how external traffic should be handled, while the Gateway implementation is responsible for processing and forwarding the actual traffic.
-
GatewayClass: defines a type of gateway managed by a specific controller. It represents a class of gateway implementations and contains configuration that determines how gateways of this class are provisioned and operated. A
GatewayClassis typically created and managed by cluster operators. -
Gateway: represents an instance of a network gateway that handles incoming traffic. It defines listeners such as ports, protocols, and hostnames that accept external connections. A
Gatewayis associated with aGatewayClassand serves as the entry point through which traffic enters the cluster. -
Route resources: define how traffic received by a Gateway should be forwarded to backend services. The most common type is
HTTPRoute, which specifies rules based on hostnames, paths, or other request attributes. Route resources reference backend Services and attach to aGatewayto define how requests are routed. -
Gateway Controller: is responsible for implementing the Gateway API resources and forwarding traffic according to the defined configuration. It monitors changes to Gateway API objects, Services, endpoints, secrets (such as TLS certificates), and other relevant resources. Based on these objects, it configures the underlying data plane that processes incoming traffic and forwards it to the appropriate backend Services.
The implementation of Gateway controllers varies depending on the technology used. In T Cloud Public we recommend switching to Envoy Gateway to manage gateway infrastructure within the cluster and integrate with external load balancers when required.
Envoy Gateway was chosen as the Gateway API implementation because it provides a straightforward and standards-aligned way to expose services in Kubernetes. The project is designed specifically to implement the Kubernetes Gateway API and translates Gateway, Route, and related resources into configuration for the Envoy proxy.
The solution builds on Envoy as the data plane. Envoy is a widely used high-performance proxy in cloud-native environments and is designed for service networking, traffic routing, and TLS termination. Envoy Gateway uses this proxy to process incoming traffic while the controller manages configuration based on the Gateway API resources defined in the cluster.
Another reason for choosing Envoy Gateway is its clear operational model. The controller manages the lifecycle of the underlying Envoy infrastructure automatically and integrates with Kubernetes primitives such as Services and load balancers. This makes it suitable for platform environments where the gateway layer should follow the standard Kubernetes networking model while remaining easy to operate.
Configuring your registar
We have to transfer the management of the NS-Records of your domain to the Domain Name Service of Open Telekom Cloud. Go on the site of your registar and make sure you configure the following:
Turn off any Dynamic DNS service for the domain or the subdomains you are going to bind with Open Telekom Cloud DNS. Change the NS-Records of your domain or the subdomains to point to:ns1.open-telekom-cloud.com and ns2.open-telekom-cloud.com
Once the nameserver changes have propagated and Open Telekom Cloud DNS service assumes authoritative control of your domain, you can proceed to define DNS zones and records. From here (assuming you have already created a Public DNS Zone in the Open Telekom Cloud DNS service for you domain), you have two options depending on your operational approach:
-
Manual Configuration
Create an A record that links the desired FQDN for each workload (e.g.,application.example.com) to the EIP of the external load balancer you provision manually.importantThis step must be performed for each individual workload or consider creating a wildcard record
*.example.compoint to the ELB's EIP if you plan to use multiple subdomains for different workloads. The former approach is suitable for smaller environments or when you prefer direct control over DNS records without automation. -
Automated Configuration with ExternalDNS
Deploy the ExternalDNS in your Kubernetes cluster. It watches Ingress resources (among others such as CRDs and Services) and automatically creates or updates DNS records in your Open Telekom Cloud DNS zone according to annotations in these resources. This approach is well-suited for dynamic environments or production setups that leverage infrastructure-as-code and minimize manual management. Follow the instructions of Automate DNS Records Creation from CCE Ingresses with ExternalDNS.
Installing the T Cloud Public DNS01 Solver
This step only needs to be performed once per cluster.
Cert-manager DNS providers are integrations with various DNS (Domain Name System) service providers that allow cert-manager, a Kubernetes add-on, to automate the management of SSL/TLS certificates. DNS providers enable cert-manager to automatically perform challenges to prove domain ownership and obtain certificates from certificate authorities like Let's Encrypt.
By configuring cert-manager with the compatible Open Telekom Cloud DNS provider, we can set up automatic certificate issuance and renewal for our Open Telekom Cloud CCE workloads without manual intervention. This automation is crucial for securing web applications and services deployed on CCE clusters.
To enable automated TLS provisioning for workloads in your CCE cluster, follow the recommended approach for as in the Best Practice: Issue an ACME Certificate with DNS01 Solver in CCE with Gateway API support.
Installing the Gateway Controller
Creating an Elastic Load Balancer
- Manual Creation of Elastic Load Balancer
- Automatic Creation of Elastic Load Balancer
This step has to take place once for every cluster as long as you are planning to use a single load balancer for all of your workloads.
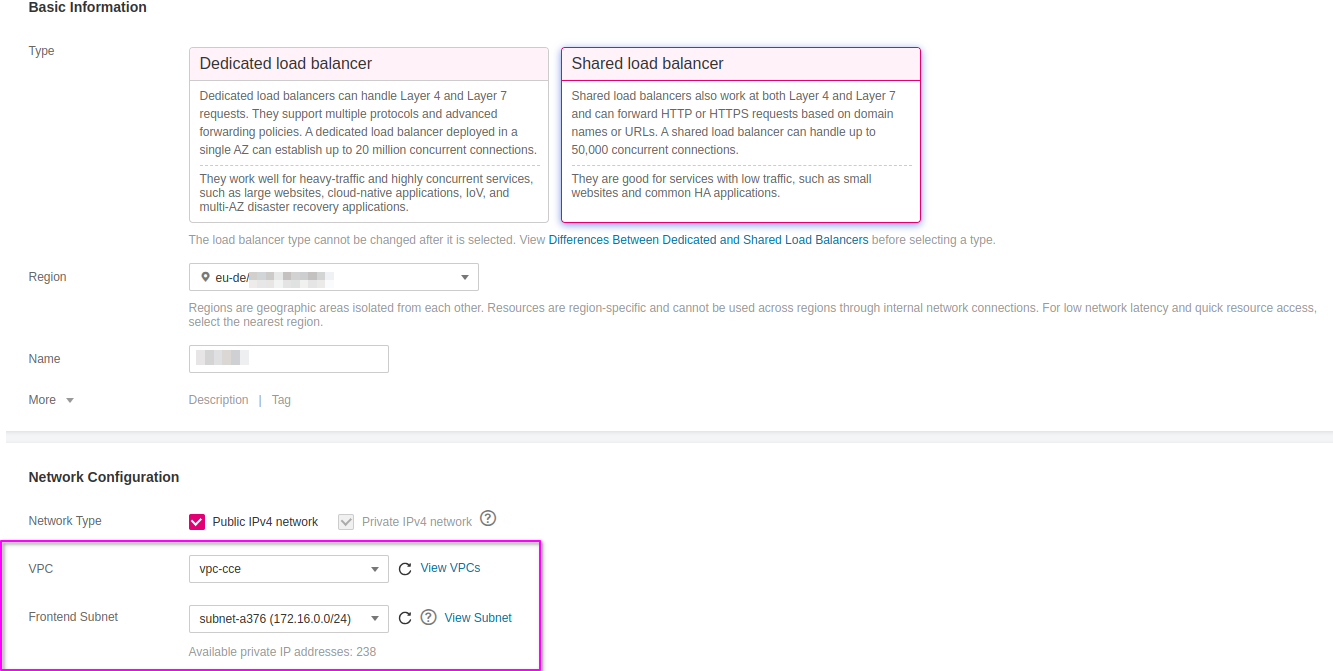
The first step in preparing the environment is to provision an Elastic Load Balancer (ELB), which will serve as the external entry point for traffic into the CCE cluster. Setting up an ELB setup is critical for handling external traffic and forwarding requests to services within the cluster.
Go to Open Telekom Cloud Console -> Network -> Elastic Load Balancing and click Create Elastic Load Balancer. Ensure that the Elastic Load Balancer is provisioned within the same VPC and Subnet as your CCE cluster. This network alignment is essential to allow the load balancer to reach the CCE worker nodes directly using their private IP addresses. Misplacing the ELB in a different network segment would result in unreachable backends and broken ingress routing.
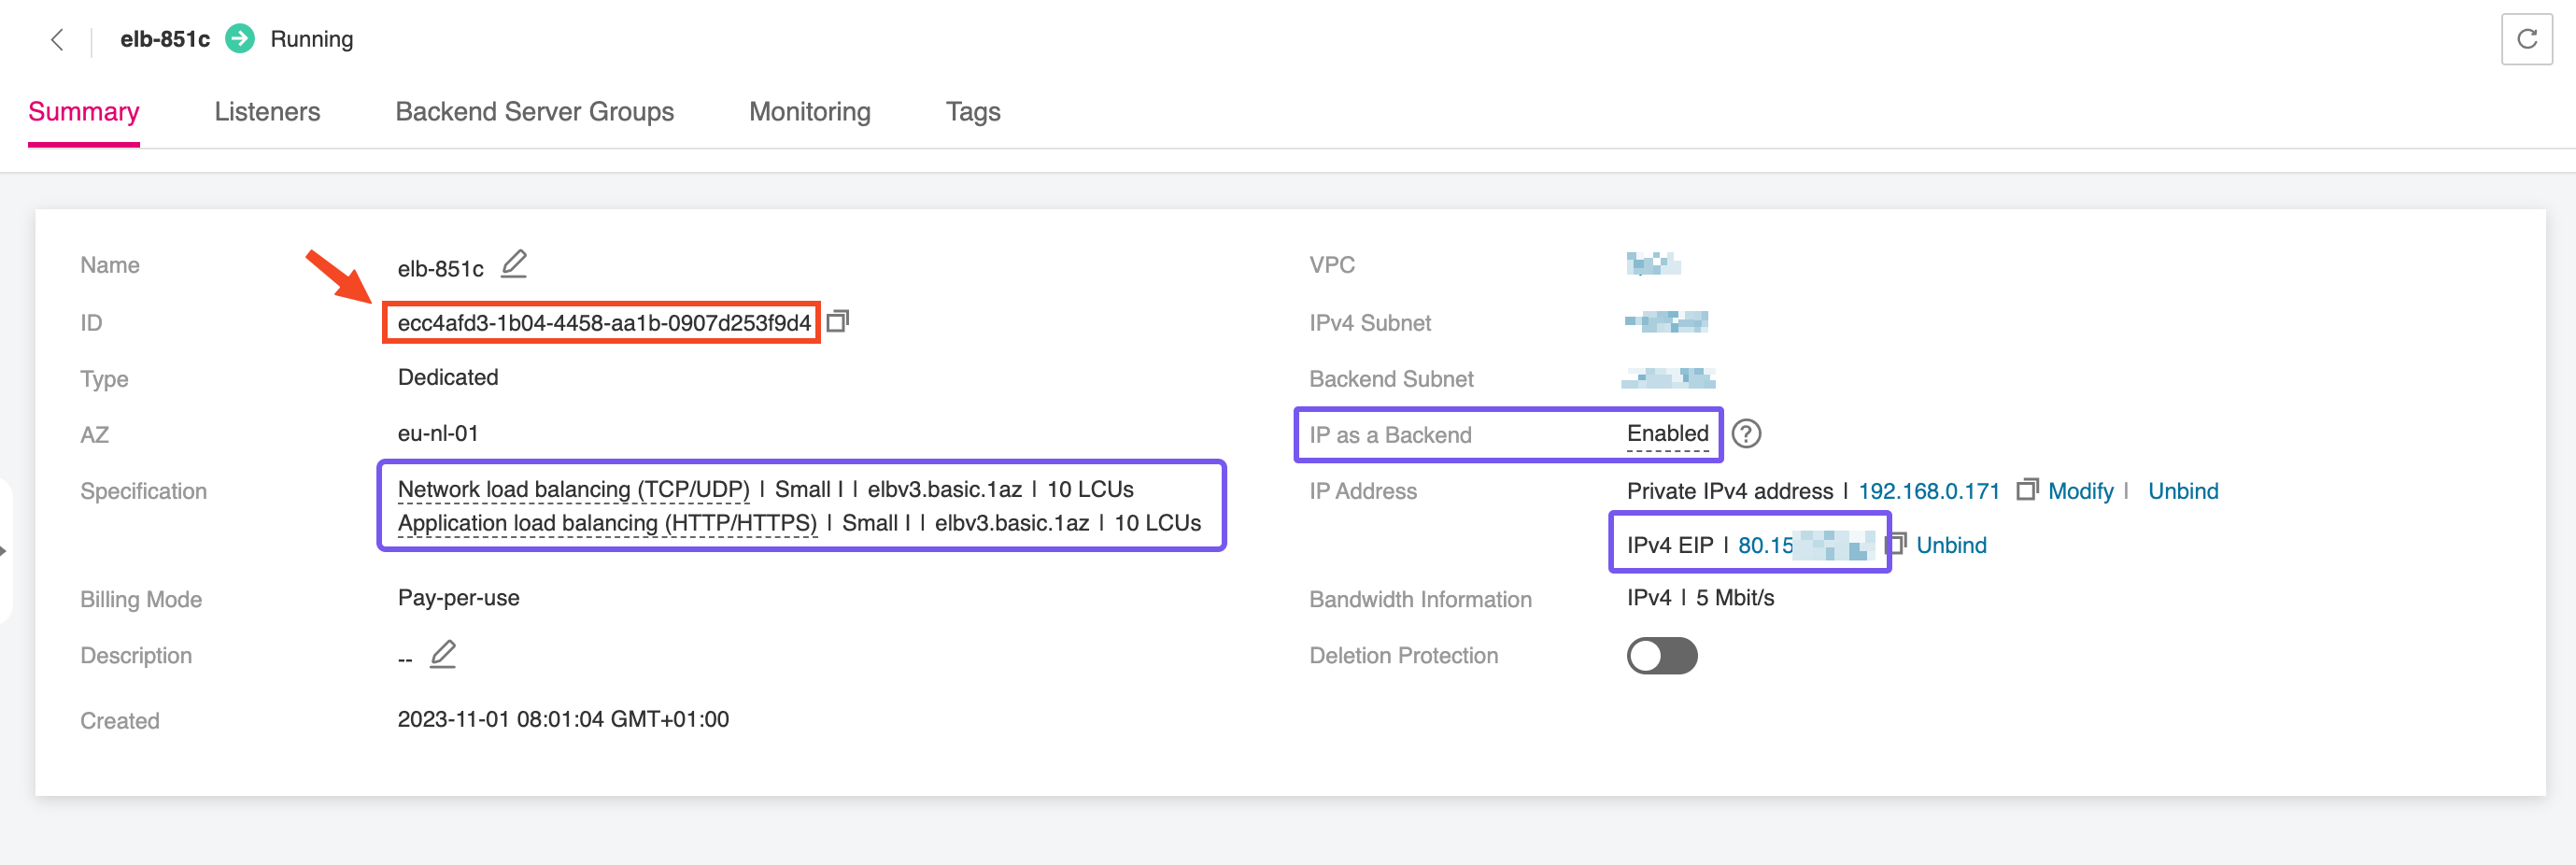
After the Elastic Load Balancer is provisioned, make sure to record the ELB ID. This unique identifier is needed when configuring the EnvoyProxy resource, enabling it to correctly bind to
the external load balancer and manage incoming traffic. The ELB ID acts as a reference to link Kubernetes resources with the underlying network infrastructure, ensuring smooth integration between
your Gateway data-plane and the public-facing endpoint.
You don't need to take any action in this case as the Elastic Load Balancer is automatically created and configured through specialized annotations defined on the EnvoyProxy resource.
Deploying the Gateway API Bundle
Before installing the Envoy Gateway Controller, we have to make sure that our CCE cluster is supporting the Gateway API.
kubectl apply -f https://github.com/kubernetes-sigs/gateway-api/releases/download/v1.4.1/standard-install.yaml
Many of the Gateway controller implementations will install and remove the Gateway API bundle for you.
Deploying Envoy Gateway Controller
This step only needs to be performed once per cluster, if you plan to use a single load balancer for all workloads.
In this step, we'll deploy the Envoy Gateway Controller, which serves as the bridge between the Elastic Load Balancer and the services running within the CCE cluster. The controller (among many others) manages HTTP(S) routing and termination, directing external traffic to the correct internal services based on host and path rules.
Deploying the CRDs
helm template eg oci://docker.io/envoyproxy/gateway-crds-helm \
  --version v1.7.0 \
  --set crds.gatewayAPI.enabled=true \
  --set crds.gatewayAPI.channel=standard \
  --set crds.envoyGateway.enabled=true \
  | kubectl apply --server-side -f -
Deploying the Controller
Create a configuration values.yaml for the Helm chart of the Envoy Gateway:
deployment:
  replicas: 2
config:
  envoyGateway:
    logging:
      level:
        default: debug
    extensionApis:
      enableBackend: true
For more information about the available Helm chart configuration values, refer to the official documenation.
and then deploy the Helm chart:
helm upgrade --install envoy-gateway oci://docker.io/envoyproxy/gateway-helm \
  --version v1.7.0 \
  -n envoy-gateway-system \
  --create-namespace \
  --skip-crds \
  -f values.yaml
Deploying the Envoy Proxy
The EnvoyProxy resource is used to control how Envoy Gateway deploys and configures the Envoy data plane that actually handles network traffic. Envoy Gateway itself acts as a controller.
It watches Gateway API resources such as Gateway and HTTPRoute and translates them into configuration for Envoy. However, the controller does not directly expose configuration options for
the underlying Envoy deployment through the standard Gateway API objects. The EnvoyProxy resource provides this additional configuration layer.
Through the EnvoyProxy resource, operators can define how the Envoy proxy instances are created inside the cluster. This includes settings such as the number of replicas, resource limits, service type,
or infrastructure-specific annotations. For example, on CCE clusters the EnvoyProxy resource can be used to configure the Service that exposes Envoy with the correct
load balancer annotations required by the platform.
The EnvoyProxy resource therefore separates two responsibilities. Gateway API resources define how traffic should be routed, while the EnvoyProxy resource defines how the Envoy
infrastructure that processes this traffic is deployed and integrated with the cluster environment. This separation allows platform operators to control the gateway infrastructure while application
teams focus on defining routing rules through the Gateway API.
To deploy an EnvoyProxy resource, we create the following manifest, envoyproxy.yaml, and deploy with kubectl:
apiVersion: gateway.envoyproxy.io/v1alpha1
kind: EnvoyProxy
metadata:
  name: envoy-proxy
  namespace: envoy-gateway-system
spec:
  provider:
    type: Kubernetes
    kubernetes:
      envoyService:
        annotations:
          kubernetes.io/elb.class: performance
          kubernetes.io/elb.http-redirect: "true"
          kubernetes.io/elb.listen-ports: '[{"HTTP": 80},{"HTTPS": 443}]'
          kubernetes.io/elb.autocreate: >-
            {
              "type": "public",
              "bandwidth_name": "cce-bandwidth-eg-ingress",
              "bandwidth_chargemode": "traffic",
              "bandwidth_size": 5,
              "bandwidth_sharetype": "PER",
              "eip_type": "5_bgp",
              "l7_flavor_name": "L7_flavor.elb.s1.small",
              "l4_flavor_name": "L4_flavor.elb.s1.small",
              "available_zone": ["eu-de-01"]
            }
1️⃣ If you are in the eu-nl region, make sure to update the available_zone to eu-nl-01 and/or eu-nl-02
2️⃣ If you provisioned the ELB manually in the previous step, you can skip all kubernetes.io/elb.* annotations related to automatic provisioning and configuration of the ELB,
and add a single annotation that points to the unique ID, <ELB_ID>, of the manually created ELB:
[...]
  spec:
    [...]
      kubernetes:
        envoyService:
          annotations:
            kubernetes.io/elb.id: <ELB_ID>
kubectl apply -f envoyproxy.yaml
Deploying the Gateway Class
To deploy a GatewayClass resource, we create the following manifest, envoygatewayclass.yaml, and deploy with kubectl:
apiVersion: gateway.networking.k8s.io/v1
kind: GatewayClass
metadata:
  name: envoygateway
spec:
  controllerName: gateway.envoyproxy.io/gatewayclass-controller
  parametersRef:
    group: gateway.envoyproxy.io
    kind: EnvoyProxy
    name: envoy-proxy
    namespace: envoy-gateway-system
kubectl apply -f envoygatewayclass.yaml
Deploying a Gateway
In Kubernetes environments using the Gateway API, two common deployment models are used to expose applications: a shared gateway and a dedicated gateway per application. Both approaches are valid and supported by Envoy Gateway and similar implementations, but they serve different operational and architectural goals.
For most platform deployments on Open Telekom Cloud Kubernetes clusters, a shared gateway is generally recommended as the default approach. It reduces operational overhead, simplifies certificate management, and allows platform teams to standardize ingress configuration across multiple services. Dedicated gateways are better suited for cases where isolation, tenant separation, or application-specific networking requirements outweigh the benefits of centralized management.
Deploying a Shared Gateway
A shared gateway is a centrally managed entry point that serves multiple applications. In this model, a single Gateway resource is responsible for handling external traffic for several workloads.
Individual applications expose their services through HTTPRoute resources that attach to this gateway. TLS termination and certificate management are typically handled at the gateway level, often using a wildcard certificate or a small set of certificates that cover multiple hostnames.
This model simplifies infrastructure management and reduces the number of externally exposed load balancers. It is therefore well suited for environments
where many applications share the same domain or subdomain structure and where platform teams operate the ingress layer as a shared service.
Create the shared-gateway.yaml manifest and apply it to your cluster. This manifest defines the shared Gateway that will be used to handle and route incoming traffic:
apiVersion: gateway.networking.k8s.io/v1
kind: Gateway
metadata:
  name: shared-gateway
  namespace: envoy-gateway-system
  annotations:
    cert-manager.io/cluster-issuer: opentelekomcloud-letsencrypt
spec:
  gatewayClassName: envoygateway
  listeners:
    - name: http
      hostname: "*.example.com"
      protocol: HTTP
      port: 80
      allowedRoutes:
        namespaces:
          from: All
    - name: https
      hostname: "*.example.com"
      protocol: HTTPS
      port: 443
      tls:
        mode: Terminate
        certificateRefs:
          - kind: Secret
            group: ""
            name: example-com-wildcard-tls
      allowedRoutes:
        namespaces:
          from: All
Next, deploy a verification workload, traefik/whoami, to test the routing.
apiVersion: apps/v1
kind: Deployment
metadata:
  name: whoami
spec:
  replicas: 3
  selector:
    matchLabels:
      app: whoami
  template:
    metadata:
      labels:
        app: whoami
    spec:
      containers:
        - name: whoami
          image: traefik/whoami:v1.11
          ports:
            - name: http
              containerPort: 80
---
apiVersion: v1
kind: Service
metadata:
  name: whoami
spec:
  selector:
    app: whoami
  ports:
    - name: http
      port: 80
      targetPort: http
---
apiVersion: gateway.networking.k8s.io/v1
kind: HTTPRoute
metadata:
  name: whoami-shared
spec:
  parentRefs:
    - name: shared-gateway
      namespace: envoy-gateway-system
      sectionName: https
  hostnames:
    - whoami-shared.example.com
  rules:
    - matches:
      - path:
          type: PathPrefix
          value: "/"
      backendRefs:
      - name: whoami
        port: 80
        kind: Service
Replace the cluster issuers, certificate and secret references, and hostnames values with ones that match your environment.
🎬 Apply both manifests:
kubectl apply -f whoami-shared-deployment.yaml
kubectl apply -n demo-1 -f whoami-shared-deployment.yaml
Deploying a Dedicated Gateway
A dedicated gateway per application provides each workload with its own Gateway resource. The application team controls the gateway configuration, including listeners, TLS settings, and certificates.
This allows applications to manage their own lifecycle and security configuration independently of other workloads. Dedicated gateways are typically used in environments that require strong isolation
between services, independent certificate management, or different network policies. They are also appropriate when applications are operated by separate teams or tenants and when each service
requires a separate external endpoint or load balancer.
Create the whoami-dedicated-gateway.yaml manifest and apply it to your cluster. This manifest defines the dedicated Gateway for the traefik/whoami workload,
and will be used to handle and route incoming traffic only for that application:
apiVersion: gateway.networking.k8s.io/v1
kind: Gateway
metadata:
  name: whoami-dedicated-gateway
  annotations:
    cert-manager.io/cluster-issuer: opentelekomcloud-letsencrypt
spec:
  gatewayClassName: envoygateway
  listeners:
    - name: https
      hostname: whoami-dedicated.example.com
      protocol: HTTPS
      port: 443
      tls:
        mode: Terminate
        certificateRefs:
          - kind: Secret
            group: ""
            name: whoami-dedicated-example-com-tls
      allowedRoutes:
        namespaces:
          from: Same
Next, deploy a verification workload, traefik/whoami, to test the routing.
apiVersion: apps/v1
kind: Deployment
metadata:
  name: whoami
spec:
  replicas: 1
  selector:
    matchLabels:
      app: whoami
  template:
    metadata:
      labels:
        app: whoami
    spec:
      containers:
        - name: whoami
          image: traefik/whoami:v1.11
          ports:
            - name: http
              containerPort: 80
---
apiVersion: v1
kind: Service
metadata:
  name: whoami
spec:
  selector:
    app: whoami
  ports:
    - name: http
      port: 80
      targetPort: http
---
apiVersion: gateway.networking.k8s.io/v1
kind: HTTPRoute
metadata:
  name: whoami-dedicated
spec:
  parentRefs:
    - name: whoami-dedicated-gateway
      sectionName: https
  hostnames:
    - whoami-dedicated.example.com
  rules:
    - matches:
        - path:
            type: PathPrefix
            value: /
      backendRefs:
        - name: whoami
          port: 80
Replace the cluster issuers, certificate and secret references, and hostnames values with ones that match your environment.
🎬 Apply both manifests:
kubectl apply -n demo-2 \
  -f whoami-dedicated-gateway.yaml \
  -f whoami-dedicated-deployment.yaml
Redirecting HTTP to HTTPS
By configuring a redirect at the gateway level, requests received on the HTTP listener are automatically redirected to HTTPS. This ensures that communication between the client and the gateway is encrypted and that applications are consistently accessed through secure endpoints. In a shared gateway this redirect can enforce HTTPS for multiple workloads at once, while in a dedicated gateway it ensures secure access for the specific application behind that gateway.
apiVersion: gateway.networking.k8s.io/v1
kind: HTTPRoute
metadata:
  name: http-to-https-redirect
  namespace: envoy-gateway-system
spec:
  parentRefs:
    - name: envoygateway-whoami
      sectionName: http
  hostnames:
    - "*.example.com"
  rules:
    - filters:
        - type: RequestRedirect
          requestRedirect:
            scheme: https
            statusCode: 301
kubectl apply -f http-to-https-redirect.yaml